
Hike Devil's Garden Loop Trail

Devil’s Garden Loop Trail is the most challenging hike in Arches, but the reward is high! You’ll get to view 7 unique arches along this trail. This is my 2nd favorite hike in the park next to Delicate Arch. The views all along this trail are spectacular, and the adventures you’ll encounter along the way are A+. The trail leads you through a dynamic landscape of slickrock, sand dunes, narrow fins, and towering rock formations. This variety of terrain highlights the geological processes that have occurred over millions of years.
Note: Don’t attempt this hike past Landscape Arch if you’re afraid of heights, get lost easily, or aren’t in good hiking shape. Wear good hiking shoes, this trail has some steep sections where you need good traction.
Hiking Info
Trailhead location: Map it
Out and back trail 8-9 miles
Rated: Hard
Challenging hike with an elevation change of 1085ft
Admission: National Park Pass is needed
Easy parking and bathrooms at the trailhead
Note: Alternatively you can take a shorter route to see 4 of the 7 Arches, cutting this hike down to 3 miles. I recommend this route if you’re afraid of heights or not super athletic or agile.

Just For Fun Park Tees
It’s always fun to get a tank or tee with the National Park name on it for photos. If you purchase an item, I receive a small commission at no added cost to you. Thank you for supporting this travel blog with your purchase!

The Hike: Devil’s Garden Loop Trail
#1 Pine Tree Arch
Follow the well marked trail to the first formation, a massive sandstone arch near a grove of pine trees. This trail is an off shoot from the loop, so after viewing it turn around and head back the way you came.

#2 Tunnel Arch
On the same trail back you can see Tunnel Arch with a distinct hole through the sandstone, and a smaller window off the the upper left.

#3 Landscape Arch
It’s hard to tell from images, but Landscape Arch is the largest arch on the planet at 306 ft wide and not too far of a distance from the start of the trail (only 1.56 miles roundtrip). This is the last Arch to see before the trail gets more advanced.


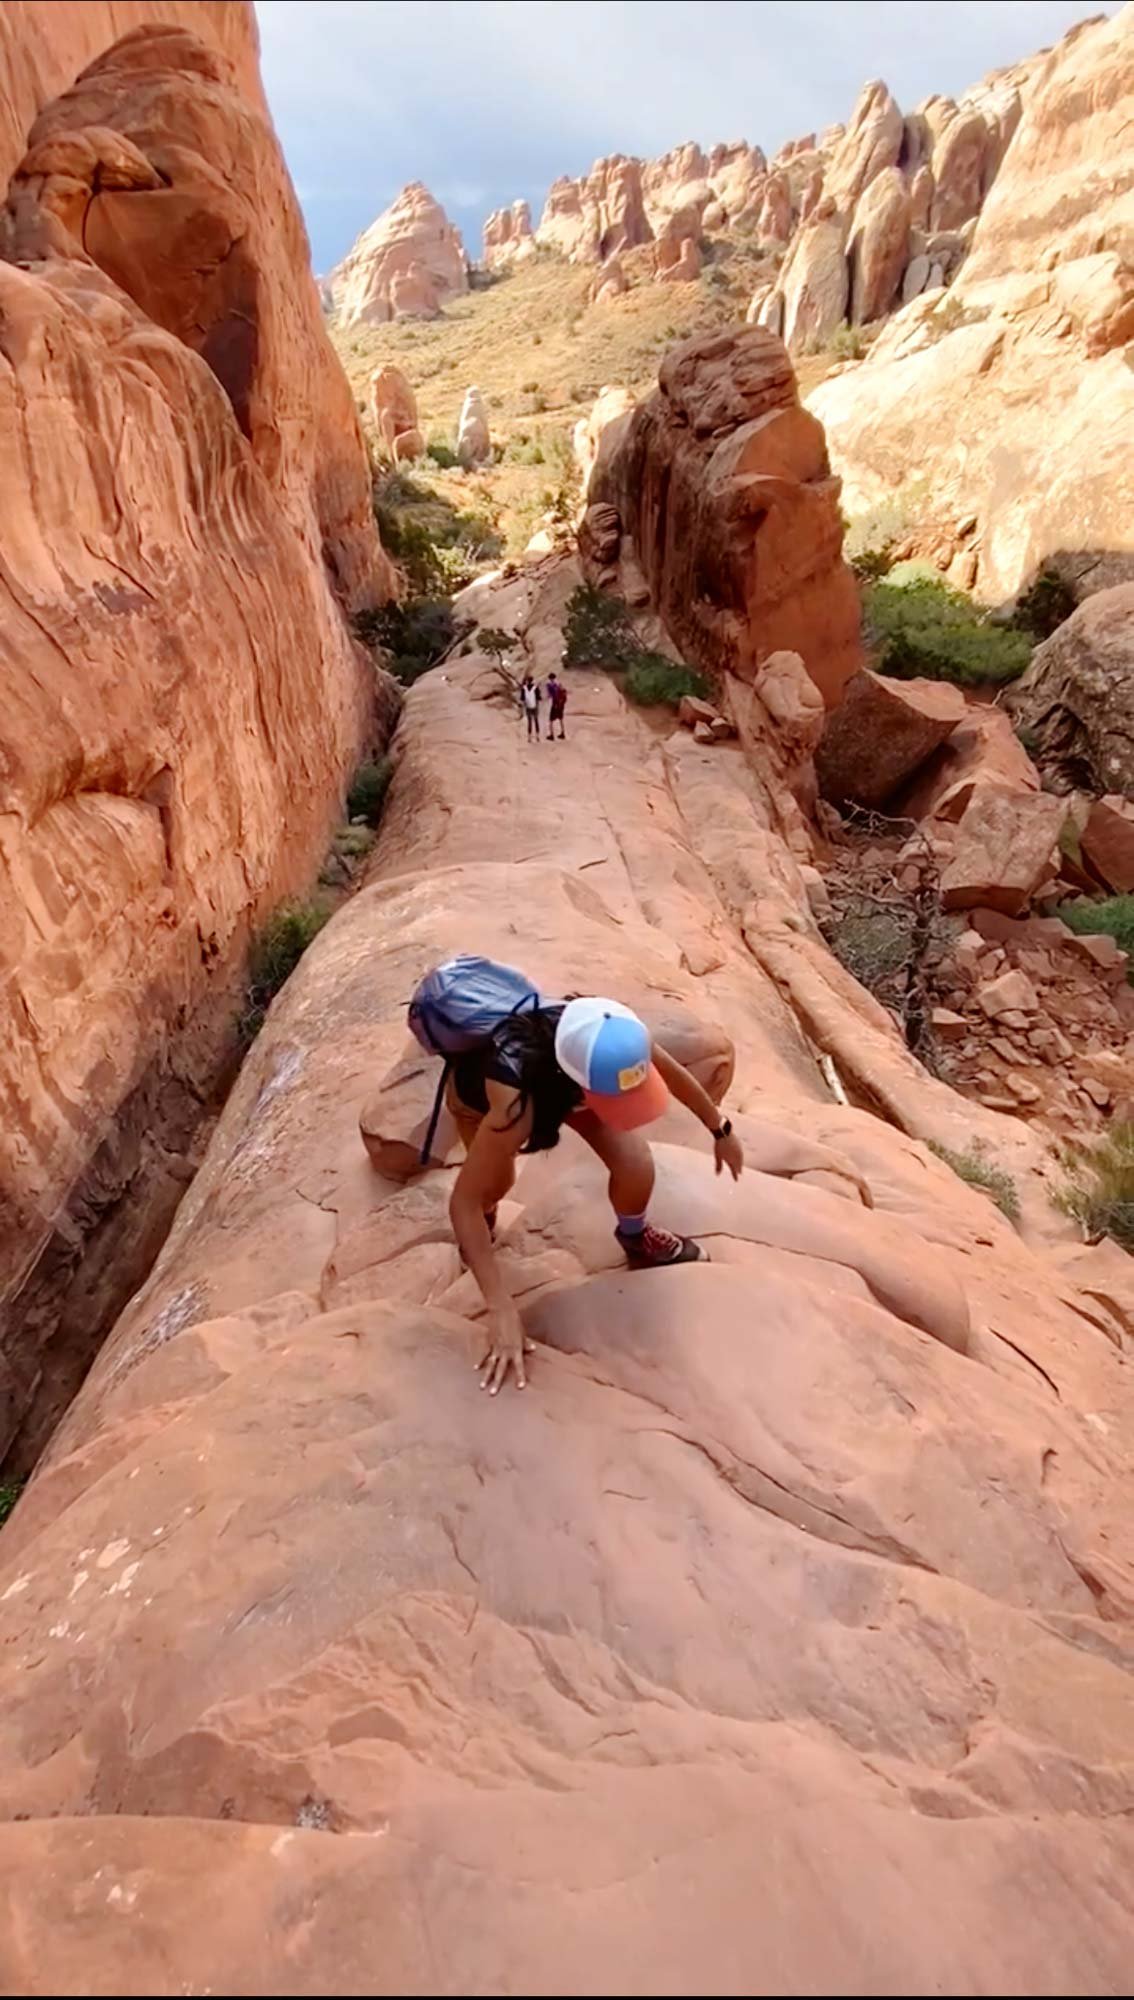
After Landscape Arch, you’ll have keep your eyes peeled for signs of the trail because it’s not always so obvious. In Arches, they use a combination of “cairns” or rock stacks to indicate a trail, or sometimes they use a spray painted dashed line on the rock.
You’ll need to rock scramble upward after Landscape Arch, at the top you should see signs for Partition and Navajo Arches. These are both offshoots, you’ll have to hike the out and back to return to the trail.


#4 Partition Arch
Partition Arch looks like a window overlooking the northern stretches of the park. In my opinion, this is the coolest view through an arch in all of the park because it’s high up and you get too see a lot rock formations as well as the valley behind it.

#5 Navajo Arch
Navajo Arch has less crowds because you have to venture out and back onto one of the spurs of the trail. It’s only about .3 miles out of the way so I highly recommend going to see it. Since the arch has sandstone also behind, it feels more like a tunnel. If you go inside it’s also well shaded if you need a break from the sun.
Head back the way you cam to the main trail and continue onward.

You’ll do a bit of rock scrambling on large boulders on the way to Double O Arch. There is a section where you walk across a long “fin,” kind of a long skinny rock runway. It’s quite stunning because you’re high up above the park and can see views all around.

#6 Double O Arch
Double O Arch has a larger upper and smaller lower opening in the rock. Can you see little tiny me down by the lower arch?

Dark Angel (Not an Arch)
This 150-foot phallic sandstone tower is half a mile on a spur of the trail to the northwest of Double O Arch. For the extra mile you have to walk to get there, I don’t think it was worth the trek. Save your energy if you’re doing the entire loop and skip it, unless you want the workout.

The “primitive trail” is really well, primitive. There’s a lot of rock scrambling and some sections that are for a more advanced hiker. It’s also not always clear which way to go.
#7 Private Arch
If you continue on the Primitive Trail this is the final arch you’ll see. It’s not the easiest to find so keep you eyes peeled. It’s also a spur (small trek off the loop), so you’ll have to hike about a quarter mile to get to it then backtrack.

You could spend a month in the this region of Utah and find something new to do each day, but for any weekend warriors here's a list of great activities.
Looking for some cute hiking clothing? My favorite hiking clothes are from Vuori. They are super soft, quick dry and comfortable.
Are you planning a trip soon? These are some of my favorite sites for finding places to stay, book tours, and more:
Booking.com for the best hotel deals
Get Your Guide to book a variety of tours and activities
Expedia for flights, hotels, rental cars and more.
Herschel for nice luggage that’s made to last

